Friday, 07 February 2020
Thursday, 27 March 2014
10 ways to childproof your home
11 Mar 2014
For many young couples, the prospect of starting a family is what prompts their first home purchase, but if you’re about to bring home a new baby, you need to make sure the property will provide a safe and loving environment.

Install safety gates at the top and bottom of all stairways and keep them properly closed at all times.
This is according to Berry Everitt, MD of the Chas Everitt International property group, who has some advice on how to create a child-friendly home. Get tips...
- Install safety gates at the top and bottom of all stairways and keep them properly closed at all times.
- Install plastic safety guardsin all unused plug points to keep out curious little fingers, and put snap locks on all ground-level cupboard doors.
- Make sure any nappy or cleaning buckets havelockable lids, and install snap locks on toilet lids too. Small children are top heavy and can easily drown in little water.
- If you have a pool, it’s best to have both a fence with a locked and alarmed gate and a safety net. Small children should also not be allowed to play in a paddling pool without supervision, and the pool should be emptied immediately after use.
- Make sure all bookcases and storage cabinets are firmly fixed to the wall with brackets so that they do not fall over if used as standing aids by a child learning to walk.
- Make sure deck or balcony railings are close enough together so that a child can’t squeeze between them. If they are not, plastic mesh at least one metre high should be firmly fixed to the vertical railings and the floor.
- Store medicines and chemical cleanersin closed, preferably locked cupboards, well out of reach of any furniture children can climb on.
- In the kitchen, be careful not to let pot and pan handles project over the edge of the stove, and never leave a chair or stool near the stove.
- If you have glass sliding doors, place bright stickers or decorative decals low down on the glass so that children can easily see when they’re closed.
- And finally, keep children out of tool sheds and garages, and keep your car locked even when parked in the driveway.
Wednesday, 19 March 2014
DIY designer outdoor furniture
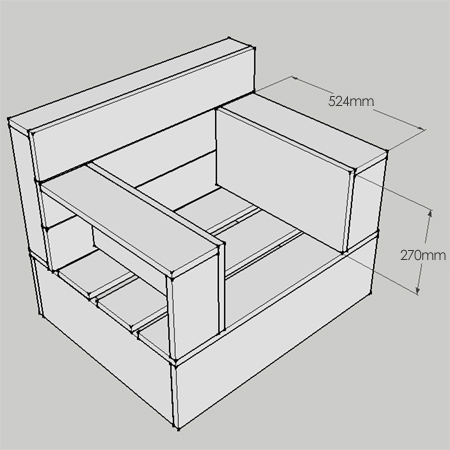
Forget my last feature for DIY outdoor furniture, this is definitely one garden suite that I want to build. The outdoor patio suite probably costs a small fortune but is a simple DIY project that anyone could tackle. I would probably use Meranti for the construction, but you could just as easily use any reclaimed timber you manage to get your hands on.
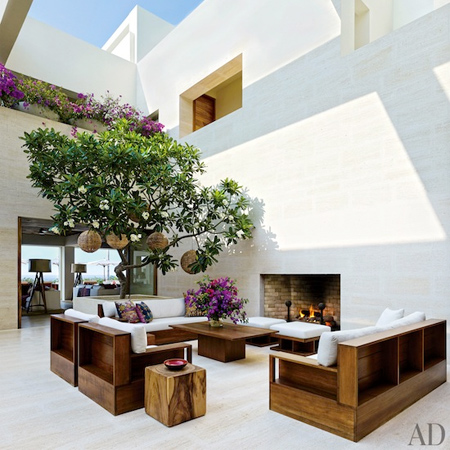
Seen on Architectural Digest, this patio set is shown in one of Cindy Crawford's holiday homes. Take a close look at the design and you will immediately see that this is most definitely a DIY do-able project for even a beginner!
While your could use PAR and laminated pine for this project, my personal opinion is that this design deserves something a bit better than pine. An affordable and far better timber than pine is meranti. This semi-hardwood is far better suited to the design of this outdoor patio set and is stronger than pine, and because you can buy wider planks, it actually works out only slightly more expensive and will last far longer.
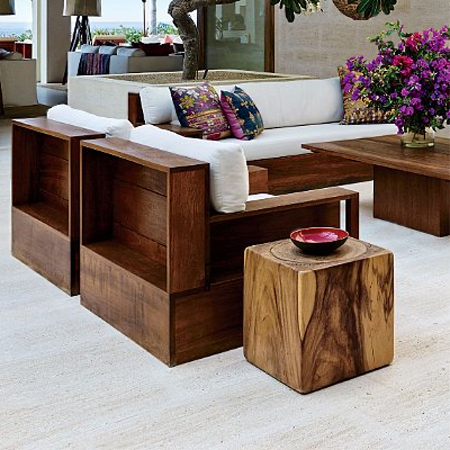
If the budget allows, you might even consider looking at using teak for this project.
I based the measurements for the diagrams below on the range of meranti planks available from Esstee Timbers. If you plan on making this project for yourself, get in touch with your local timber merchant to see what sizes they supply.
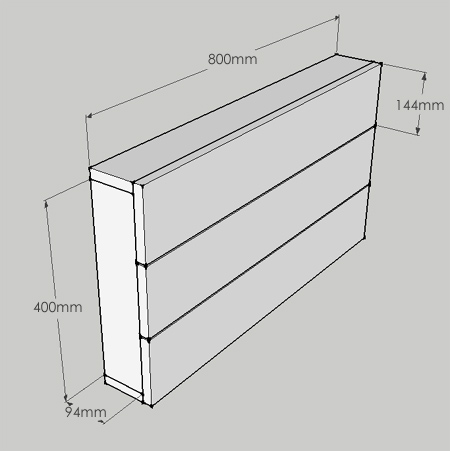
SEAT BACK
SEAT BASE
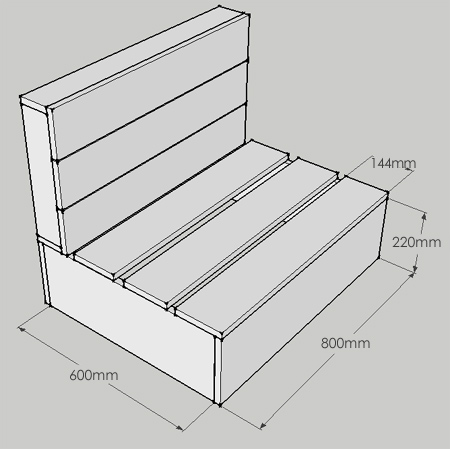
SEAT ARM
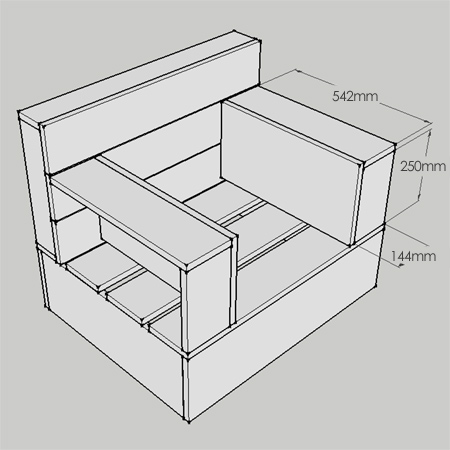
SEAT ARM PANEL
To join the individual panels together you could use your preferred joining technique, which can include pocketholes, dowels or biscuits.
Do use exterior wood glue when making any furniture that will go outdoors.
Seal or varnish the piece after assembly to ensure protection from the elements. Plascon Woodcare has a range of preservative and sealers that can be used on any wood.
If you do make this project, feel free to share with us. We might just be able to organise a tool hamper for the best project.
Wednesday, 13 November 2013
Trendy world map wallpaper décor
12 Nov 2013

Map wallpaper creates an instant effect by drawing attention to the impressive visual.
Wallpapered.com says while there has always been plenty of choice when it comes to wallpaper, in the last couple of years a new trend of adorning your interiors in murals has emerged. World map imagery in particular has quickly become iconic in the field of interior design.
Informative yet beautiful, stylish world maps can be used as a feature wall or even as a method of keeping track of the places one has visited.
Map wallpaper covering a full wall creates an instant effect by drawing attention to the impressive visual. The world map mural is also an ideal choice for a child’s playroom or bedroom.
The cartography design is an educational and inspirational tool for children of all ages as well as for geography enthusiasts.

Applying wallpaper to walls is a quick and easy way to dress up a wall, as long as the walls are smooth.
Alternatively, you can use world map wallpaper on stairs, tabletops and to decorate the back of your closet or bookcase. You will find all the supplies you need to apply wallpaper at your local Builders Warehouse.
The information contained in this article is supplied by London-based Wallpapered.com. Wallpapered.com specialise in digitally printing custom wallpaper. They have a collection of World Map Wallpaper designs that are beautiful and comprehensive. They have a large range of modern and antique maps styles to satisfy any interior space.
Article courtesy of www.home-dzine.co.za.
Friday, 04 October 2013
4 TV room hygiene and care tips
03 Oct 2013
Thursday nights is TV time for some people and it’s really the only time they walk away from the PC and take a break. This made me think about how much we spend in front of the TV, especially when it’s a sports weekend or soapie time.

As the seasons change, so does the angle of light entering the room. Daytime viewing can be a mission if the sun is shining on the TV or reflecting through a window. Stop the glare by fitting shades or blinds that can be opened/closed or angled to deflect natural light entering the room and spoiling your viewing time.
1. Don't let greasy fingerprints spoil your view
Switch off the TV before you do any cleaning. Use a lint free or microfibre cloth to clean your TV screen and avoid anything that might scratch the glass, such as paper towels. You don't need to apply cleaners to the screen, just use the cloth and wipe the screen from left to right, starting at the top and working your way down in a single wipe. This will clean up any greasy marks and remove dust.
2. Dust up the speakers
Most people would simply wipe with a damp cloth or furniture polish but this pushes the dust inside the grilles - rather use a soft makeup brush to lightly brush over speaker grilles to remove dust and then wipe with a lint-free or microfibre cloth.
And don't forget to clean circulation grilles and vents at the back or side of the TV. These vents help to keep the inner workings of your TV cool, so prevent dust from blocking them up.
3. Detox the remote
Baby wipes are ideal for cleaning a TV remote and for wiping off last night's TV dinner. Plus, a regular cleaning with baby wipes will keep your TV remote germ-free. Switch off the TV before you clean or you will be surfing through channels and changing your settings before you know it.
If you have a PVR you will know how handy the rewind/fast forward/pause button is and how you can easily get into a panic when it gets stuck. Chances are the button is all gunked up and you can easily open up the remote to clean out any gunge. Do take care when opening and make sure you put everything back properly.
4. Take the glare out of TV
As the seasons change, so does the angle of light entering the room. Daytime viewing can be a mission if the sun is shining on the TV or reflecting through a window.
Stop the glare by fitting shades or blinds that can be opened/closed or angled to deflect natural light entering the room and spoiling your viewing time.
If you're not prepared to fork out for window treatments, try angling the TV or moving it to a new spot. - Janice Anderssen
Article courtesy of www.homedzine.co.za
Tuesday, 01 October 2013
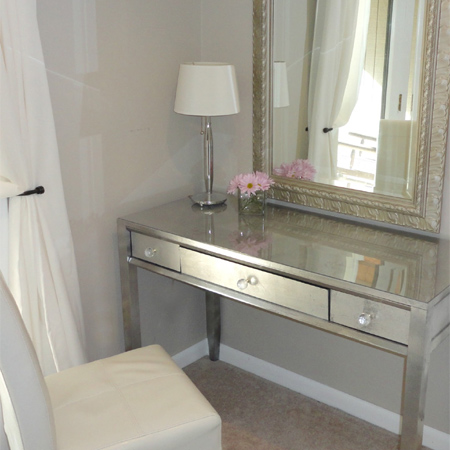
Dressing table with silver leaf finish
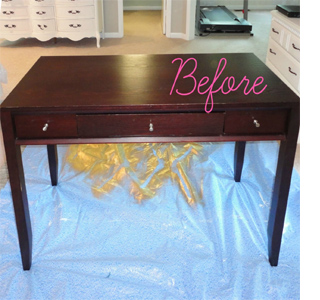
When you discover a secondhand find that is still is good condition, you can do almost anything with it. You can restore it, paint it, or you can add silver leaf and transform a plain dressing table into a gorgeous piece of modern furniture.
That's just what Virginia did at livelovediy - and it turned out awesome.
Here's how the table looks after being covered with silver leaf and with the addition of a glass top... absolutely stunning.
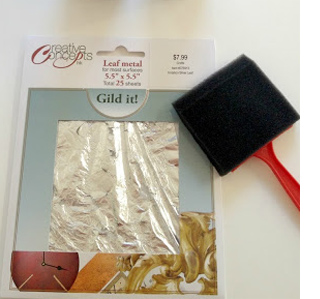
All you need for this project is some silver leaf, size (glue), a foam sponge pad and a paintbrush.
You will find silver leaf at craft and hobby stores, or get in touch with Brasch to find your nearest supplier.
GOOD TO KNOW
Put down a dropcloth or newspaper before you start - gilding can be messy!
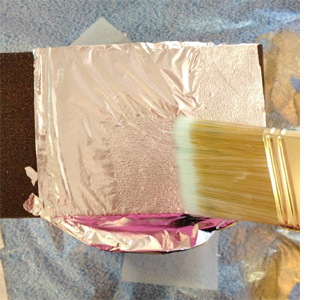
To cover furniture in any kind of leaf you first need to apply size (glue) over the surface.
Work in sections and apply size to the surface and allow to dry until clear, or for approximately 20 to 30 minutes.
Gently lift a sheet of silver leaf and place over the size.
Brush with a soft paintbrush.
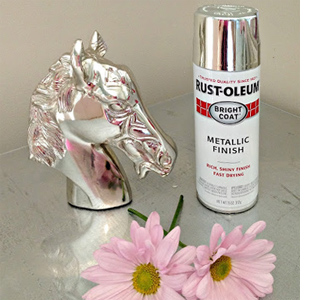
To cut down on the amount of silver leaf used for this project, Virginia spray the legs with Rust-Oleum metallic finish.
You can use Rust-Oleum Universal - titanium silver to achieve a similar effect.
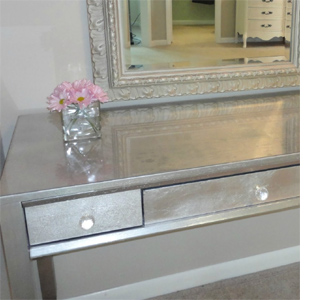
To finish off the table and for added protection, a glass top is added to the dressing table.
You can have 5mm glass cut to size at your local Builders Warehouse.
- See more at: http://www.home-dzine.co.za/bedroom/bedroom-silver-leaf-dresser.htm#sthash.h68EDCaP.dpuf

Tuesday, 10 September 2013
Paint your new home before moving in
09 Sep 2013
You have bought your first property, but now you want to turn your new house into your new home by adding some personal touches. The best way to do this in a relatively cost effective and easy way is by giving the home a new coat of paint.

Not having to move furniture around or cover it up will save a lot of time when painting.
He says just by adding a fresh coat of paint, the home will immediately seem cleaner, more welcoming and more like yours. He says according to home décor experts, the best time to paint the interior of a home is before moving in for a number of reasons.
Reduces the effort
It is far easier and less physically challenging to paint the inside of a home when there is no furniture in the way. Goslett says having an empty room will help you move around more freely and place a step-ladder in and around the home with far less effort.
He says painting after the furniture has been moved in will mean manoeuvring heavy objects around to get to hard to reach places.
Saves time
Not having to move furniture around or cover it up will save a lot of time when painting. There will also be a lot of time saved from not having to take down any art or pictures from the wall.
Saves money
Goslett says if the new homeowner is painting the home themselves there won’t be much money saved, however, if they have hired a professional painting contractor or some workers to do the job it can possibly save them in costs.
“The painters will be able to move from one room to the next far faster, which will save money if they have been contracted on a daily rate. Less time spent on the labour will essentially mean less money spent on labour costs.”
Protects your furniture
It is simple, if there is no furniture in the home, it can’t get ruined. Goslett says regardless of how careful the new homeowner or a painting contractor is when painting, there is always the chance that paint could spill or paint specks could find their way onto the furniture or into electrical appliances.
He says that could be a rather expensive fix depending on where the paint lands.
Decorating the home
This is particularly true if the homeowner has not yet bought any décor items for their new home. Having a specific colour palette to work from will make the process of decorating a room far easier, says Goslett.
He advises that if you are unsure when choosing paint colours, you should test several shades of the colour selections on the wall in a section of your new home. The painted area should be allowed to dry for 24 hours before viewing it, he says.
“View the colour swatches in the morning, noon and evening, as the colours will appear to be different tones depending on the time of day. This will give you the chance to compare the shades to see which one is best for you.”
Goslett says purchasing a new home is an exciting time and painting your home is a great way to express your individuality and ensure that your home reflects your sense of style and personality.
Subscribe to:
Posts (Atom)