Friday, 28 September 2012


Put in a lap pool


Homeowners are realising the benefits of installing lap pool as opposed to a conventional swimming pool. As more people look for healthy lifestyle options, the value of installing a lap pool allows you to exercise at home to improve both health and fitness. Stretch your planned swimming pool into a lap pool and reap the rewards of a pool that offers both fun and exercise.


[ via anthony pools ]

A lap pool is generally descibes a swimming pool shaped to provide a longer swimming length than the conventional home swimming pool. This elongated length allows the pool to be used for exercise a length.

[ via sa pools ]


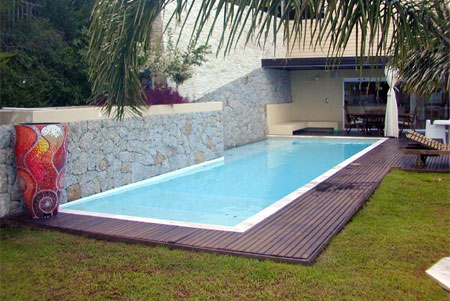
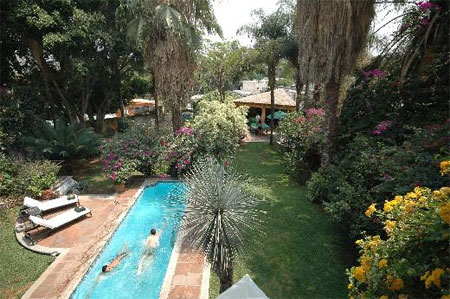
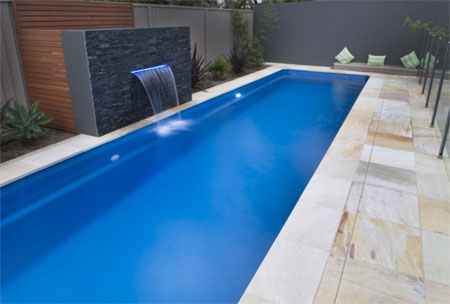
A lap pool generally takes up far less space than a conventional swimming pool and can be designed to fit into even a small garden.
As property sizes decrease to keep costs low, installing a long, narrow lap pool allows the homeowner to build a pool according to their needs.


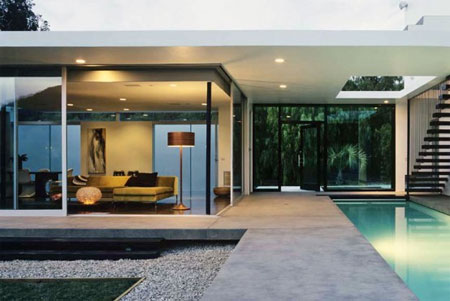
In comparison to a conventional swimming pool, a lap pool is less expensive. And it will take up less space. A full length lap pool in your garden also has the advantage of giving you a place to entertain. Plus the size of a lap pool means they are easier to clean and maintain, and as less expensive to run than a traditional pool.


Pool length and depth 
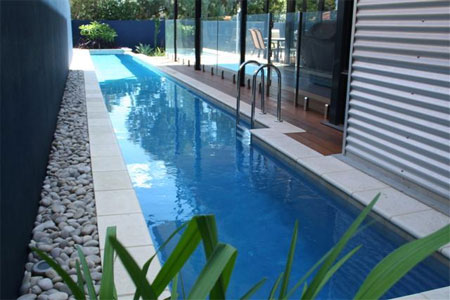
If you are planning to build a lap pool, take into consideration that a 6 metre x 2,5 metre lap pool will provide the exact same swimming length as a 6 metre x 5 metre pool, but will cost substantially less to build.
You also need to consider that a narrower lap pool will be easier to maintain, since half the size of the pool will be easier to clean, requiring only half the amount of pool chemicals, at half the cost.
The standard depth for a lap pool is generally around 1 metre to 1,2 metre throughout the length. Most health clubs offer pools for training at this depth, which is sufficient for diving in and turning at the end of each lap.


Pool Access 
If you plan to use a lap pool for exercise only, consider the option to access the pool via a removable stainless steel ladder. Built-in steps can be a hindrance to swimming laps and they take up valuable swimming space.


via ]
Lighting and Landscaping
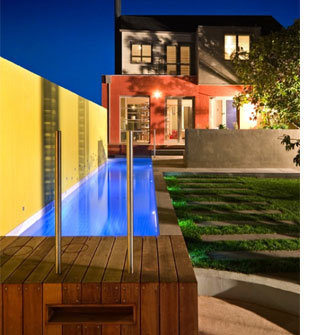
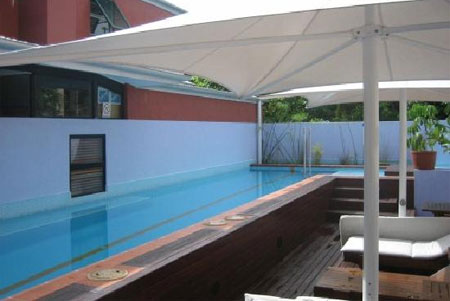
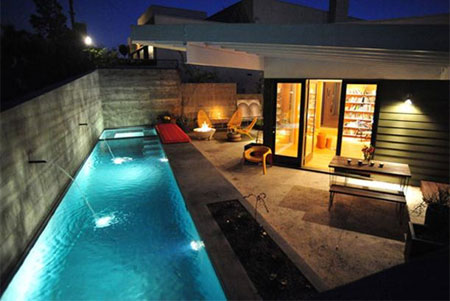
Adding lighting to a lap pool transforms the pool from ordinary to dramatic. Submerged lights allow for nighttime exercise or relaxation. Optional colour wheel lighting allows you to colour the pool to suit your mood.
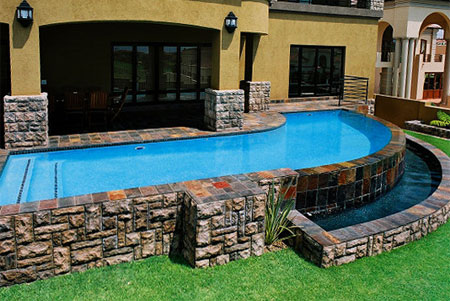
A lap pool can be built in ground or sit partially above ground level. This allows the homeowner to design landscaping to surround the pool, be it paving or a deck.


Thursday, 20 September 2012

Bathroom Decorating: Pamper Yourself with a Master Spa Bathroom


We all deserve a little pampering now and then, and visiting a spa can be a relaxing or invigorating treat that everyone should experience, but why not give yourself the luxury feel of a spa every day of the year? You can enjoy the look and feel of a luxurious spa in your very own master bathroom, and it is not necessary to remodel the master bathroom or spend thousands of dollars in the process. It is possible to recreate the luxury of a spa with a few decorating tips and professional spa tricks, and absolutely anyone can turn their master bathroom into the spa of their dreams. 


Clear the Clutter

If master bathroom countertops and shelves are filled with beauty supplies and other bathroom necessities, clear the clutter to give the room a more refined appearance. Place makeup, beauty supplies, and other items that typically clutter a bathroom into attractive lined baskets, and place them out of sight on shelves or in a cabinet. Once the countertops and other horizontal spaces are free from clutter the room can be decorated to look more like a luxurious spa room instead of a storage facility.

Decorate with Baskets of Fluffy Towels

Many people tuck away towels in a linen closet, but they can be used as part of the decorating scheme in a master spa bathroom. If space allows, purchase large baskets without handles as well as soft and fluffy color-coordinating towels and washcloths similar to those found at a posh high-end spa. Roll the towels and facial cloths and arrange them in the baskets. They will be within arms reach while adding color and unique design to the room.

Fill the Master Spa Bathroom with Fragrance

Aromas have the power to alter the mood, and what better place to use fragrance than in a master spa bathroom? A few scents that promote relaxation are lavender, rain, ocean breeze, neroli, cypress, rose, and chamomile. If you want a master spa bathroom that will invigorate choose scents such as eucalyptus, tea tree, mint, or citrus. Add essential oil in a scent of your choice to a decorative jar filled with Epsom salts, and add it to a warm bath for an invigorating or a relaxing soak. Let yourself escape to another place in your very own master spa bath to help rejuvenate your spirit as well as your mind and body.
Install Dimmer Switches
Bright lights are sometimes necessary in a master bathroom, but when enjoying a relaxing bath or a warm and invigorating shower, it is nice to dim the lights and lighten the mood of the room. Consider installing dimmer switches that will allow you to have complete control over the intensity of lighting, and choose room-enhancing light bulbs to give it a natural glow. In addition, decorate the master bathroom with candles, and enjoy relaxing by candlelight on those really tough days when you want to soak away the stress and leave your troubles behind.
Choose Candle Wall Sconces
Instead of decorating with simple jar candles, add more to the design of the master spa bathroom by purchasing beautiful candle wall sconces. Jar candles or candles on trays are lovely when placed on the sides of the bath, but candle wall scones complete with flickering candles bathe the walls with a soft and natural glow. You will discover all price ranges and styles to meet every budget and preference, and just the right candle wall sconces will complete the look of your stylish master spa bathroom.


Senior staff writer for Wall Decor and Home Accents offers many more tips and decorating ideas onsite. Stop by to view many more options and creative ideas for decorating with modern wall art wall hangings , wall mirrors, and architectural pieces.


Tuesday, 18 September 2012


How to restore your parquet floors


You either love or hate parquet floors but, when cared for and maintained, they are a valuable investment in a home. If not, you can fix it yourself.
Wooden or parquet floors are an investment to your home and like everything else, they need maintanence and care.
If you have parquet floor buried under layers of carpet, perhaps you should consider restoring the floor to its original condition.
Installed using small blocks or slats of wood in varying patterns and designs, parquet floors are common in many older homes inSouth Africa, being installed when hardwoods were more easily available.
Patterns for parquet floors may be herringbone or basket-weave, or more complex designs incorporating squares, triangles and lozenges of differing wood species.
However, as with any wood floor, parquet needs regular maintenance to ensure that it stays looking good.
Replace missing or damaged parquet blocks
You will need:
Bitumen glue remover
Contact adhesive
Clean cloths
Rubber gloves
Paint scraper
If your floor is badly scratched, you will need to hire an orbital floor sander in order to sand down and if possible, hire a sander that has a dust collection bag.
The main problem experienced with parquet floors is that the blocks tend to come loose over time.
Replacement blocks, commonly referred to as plugs, can be cut from the same type of timber and sanded to blend with the existing floor design.
While genuine parquet floors are nailed or pinned down, many installations have been done over a concrete floor using bitumen glue – a petroleum derivative that is thick and sticky and dries to a hard, black layer, gripping and holding the blocks in place. The problem with this type of installation is that over time, the bitumen becomes brittle and the blocks break loose.
When replacing blocks it is necessary to scrape away the bitumen glue from the floor and the loose block, before applying a suitable contact adhesive to both surfaces to glue the block back in place. You can find professional bitumen and glue removers at your local hardware store.
Restore a scratched parquet floor
You will need:
Orbital floor sander
80/120 and 220/240-grit sanding pads
Dust mask
Plastic sheets
Masking tape
Vacuum cleaner
In many installations, bitumen glue is used to stick the blocks in place.
It is far easier to regularly maintain a parquet wood floor than to have to sand and re-seal the floor.
Unfortunately this isn’t always easy.
Move into a new home and you may find yourself the owner of a parquet floor in desperate need of attention. Or perhaps you are restoring an older home and the floors are in a terrible state.
If your floor is badly scratched, you will need to hire an orbital floor sander for the day in order to sand down. If possible, hire a sander that has a dust collection bag. Although this will cut down on the amount of dust, you will still need to wear a dust mask, open windows and close off any vents or wall sockets with a sheet of plastic stuck down with masking tape.
Tip:An orbital floor sander will be gentler on parquet floor, as it doesn’t run in one direction but rather in several directions as a result of the patterned design.
1. Before starting to sand, make sure that any loose blocks are removed and placed out of the way for the time being.
2. Using a medium grit sanding pad (80 or 120-grit) start at one end, at the far side of the room and guide the floor sander over the area to be sanded. As you complete one strip, turn around and repeat until you have completed the entire floor.
3. Repeat this process with a 220 or 240-grit sanding pad; this step reduces the roughness left by the medium grit sandpaper and leaves a smooth surface, ready for sealing.
4. Clean up all the remaining dust with a water filtration vacuum cleaner. This is by far the best option, as it doesn’t re-circulate dust back into the air. Another alternative is to use a mop lightly dampened with mineral turpentine to wipe away the dust.
Stain and seal parquet flooring
To ensure that your floor is looking good for as long as possible, simply wipe it regularly with a soft, damp mop.
You can purchase a ready-tinted sealer in various colours, or purchase a clear sealer and mix in your own stain.
Whatever option you choose, you will need a quality indoor sealer that is specifically designed for wood floors.
For floors we recommend Woodoc 25 satin floor sealer, which is wear resistant and is designed to protect and enhance the beauty of the wood grain, providing a deep, natural polished finish.
1. While using a roller is not recommended, if you apply the sealer liberally it makes the job far easier, especially when covering a large area. You will need a paintbrush for around the perimeter. If you find that the sealer is immediately absorbed into the wood after no more than five minutes, apply additional sealer for the first coat. This coat needs to dry before you move on to the next step.
2. Use ultra fine steel wool to lightly rub over the sealed surface to remove excess sealer remaining on the top. This allows the next coat to penetrate deeper into the wood to provide the utmost protection. Wipe clean once you have rubbed down.
3. Apply a second and third coat of sealer to the floor, allowing each coat to dry thoroughly. The floor will be touch dry after 24 hours, but refrain from replacing furniture into the room for at least 2 days to ensure proper curing of the product.
To extend the finish of your new floor and keep it looking good for longer, simply wipe with a soft, dry mop regularly.
Article courtesy of www.home-dzine.co.za

Monday, 17 September 2012

Create elegant wall sconces


14 Sep 2012


Wall sconces have been around since the medieval ages, but that doesn’t mean you have to pay antique prices for one. You can create your own rustic wall sconces using this project.
Wall sconces add a touch of elegance to a room, and are quite simple to make.
You can use whatever you like to decorate you wall sconce.
If you like, you can choose to create a mosaic or simply carve a design into the wood.
We have opted for decorative stones.
You can purchase the stones, glass tea light candle holders, a pack of glue sticks and some sponge brushes at any home and craft store.
You will need to go to the hardware store and pick up some small 'L' brackets and small picture hangers.
Use a wood board that is 12mm thick and cut 2 pieces of wood 200 x 140mm and 2 more 100 x 140mm.
Sand down the rough edges off the wood and paint the front and sides and leave them to dry.
Hot glue the two rectangles together to keep them in place while you secure the 'L' brackets.
If you are using SupaWood, you can use Rust-Oleum 2X to spray paint the wood, or use a stain and Woodoc 5 or 10 interior sealer for pine.
Once the paint has dried, nail the picture hanging hardware to the back, top part of the larger rectangles.
Then hot glue the small bottom piece onto the back.
This is to just hold it in place while you secure the 'L' brackets in place.
Lay the sconce down on its back and glue the stones onto it, trying to fit them together as tightly as possible.
Start from the bottom working up, try not to go over the sides, but finish off over the top edge.
Using a hot glue gun, glue the candle holder to the bottom in the centre, add a candle and you're done!
Now you can place your wall sconce in any room you chose and add a bit of old worldly elegance to your home.
Article courtesy of www.home-dzine.co.za

Thursday, 13 September 2012

Home Storage Solutions


Home Storage Solutions

Gone are the days of sprawling mansions with unused rooms; today, most modern homes are smaller in size, and without proper planning, storing all the handy gadgets and day-to-day necessities may present a problem.
The trick is to use each space to maximum capacity, and rather than thinking outside the box, to install a few drawers in it and use it as a coffee table to boot.

“Inside the home, the rooms that most often present challenges for storage are the kitchen, children’s rooms and home office,” says Caron Bass, a freelance interior designer. “The solution is simply to take the time to assess how existing storage space can be best used, where each item is best stored for practical use and then to let your imagination go on creative ideas of how to create even more practical storage space.”

“Fill your home with things that serve a definite purpose or are beautiful to you.”
Bass explains that a good example of this is to keep kitchen counters clutter-free. “Make use of wall space by hanging utensils, pots and colanders from beautiful hooks which can be bought for a relatively small price and can become a stylish feature in your kitchen.” She adds that beautiful crockery can also be stored on shelves, and the colours of plates etc. can be incorporated into the theme of the kitchen. Each item also needs to be stored near the space where it is most often used: spices above the oven and mugs hanging above the kettle, for example.

“Make optimal use of kitchen cabinets by installing turntables in awkward corners, placing a bin in one to clear limited floor space, putting your microwave oven in another to clear a counter and perhaps even installing cabinets specifically designed for maximum storage,” says Bass.

An alternative would be to simply insert drawer and cabinet partitions to allow better organising of items. Bulletin boards are handy for arranging important documents, slips and mail, while a decorative basket in a centrally located space can house miscellaneous items such as keys and sunglasses.

The same principles apply to children’s rooms, where wall-hanging units can be used to store anything from socks to art supplies. Brightly coloured baskets, bins or boxes can be used to sort, label and stack toys, and every nook and cranny of cleverly designed bunk beds can be used to store essentials. Local parenting website www.Kidzworld.co.za offers a handy directory of various suppliers who offer a myriad practical products that kids love.

In addition to the ideas listed above, shelves are extremely handy in any home office, and can be used to store books, documents, supplies and even equipment such as printers. “Floating shelves are relatively inexpensive, come in a range of different colours, sizes and textures, and are the most popular choice in interior design at the moment,” says Cape Town-based interior designer Michael Kieck. “This could be attributed to both their easy installation and sleek design.” Local design websites such as www.ode.co.za supply a whole range of stylish wall-mounted floating furniture that provides practical solutions to storage problems throughout the home.

“Another fantastic trend is the use of multi-purpose furniture,” says Kieck. The popular trending websitewww.pinterest.com offers creative ideas on both DIY multi-purpose pieces as well as names of stockists of beautiful furniture in every price range.

The available space in a home should also be used optimally. “Using an existing loft or even adding a mezzanine floor is a very effective way of using existing space in the upper section of the home,” says Kieck. A loft conversion need not be a costly exercise. Local companies such as Loft-E-Ladder (www.loft-e-ladder.co.za) offer affordable solutions that are easily installed.

A smaller home often also has limited storage space in the garden and garage. Bass recommends treating both these areas as you would rooms in your house. “Hooks, shelves and containers can go a long way to storing items in the garage, and multi-purpose garden furniture offers space for keeping anything from pruning shears to pool-cleaning equipment.” If the size of your garden permits it, a Wendy house offers ideal extra space.

Once you’ve used every available storage space in and around your home and you are still left with a pile of things that have no space, look up the nearest self-storage facility and rent the space you need. These facilities offer spaces ranging from a quarter-garage size for those odd boxes to enough space for a boat. “But remember,” says Kieck “only acquire, keep and fill your home with things that serve a definite purpose or are beautiful to you.”


Written By - Christelle Wiese
Photos - iStockphoto


Wednesday, 12 September 2012


With the ever improving solar technology, you can now buy
solar LED floodlights and spots for your garden, for both
landscaping and security purposes and really save energy
and money by utilising free sunlight.
The Lighting Warehouse Page 1/2
SOLAR FLOODLIGHTS
AND SPOTS
New at The Lighting Warehouse
Press Release
Mongoose-24 LED Double Solar Spotlight (code: 17733) -
R499.95:
Twelve super bright LEDs per spotlight give a high powered
beam that will illuminate approximately 5m², ideal for garden
landscaping. The Mongoose spotlight is powered by a solar
module, which can be positioned up to three metres away
from the lights themselves. The replaceable and rechargeable
sealed battery pack can power your light for up to eight hours
on a full charge. This Mongoose solar double spot set gives
you peace of mind by adding light to your property at night
without incurring high electricity bills.
Technical details:
12 super bright LEDs per spot
6V 4Ah rechargeable battery
9V, 200mA solar panel, with built-in circuit to prevent
overcharge
Automatic day/night switch
Durable ABS plastic construction, easy to install,
garden spikes included
Completely solar-powered, no electrical wiring
needed
IP44 rated
Sunbather-28 LED Floodlight (code: 17734) - R599.95:
Twenty-eight super bright LEDs create a high-powered
beam of illumination of approximately 50m². The Sunbather
Solar Floodlight is powered by a solar module, which can be
positioned up to three metres away from the light itself. The
replaceable and rechargeable, sealed battery pack can power
your light for up to 8 hours on a full charge. This floodlight
gives you peace of mind knowing that your residence is
securely lit at night without having to incur high electricity bills.
It can be easily mounted on walls or wooden posts, and it
comes with screws.
Technical details:
28 super bright LEDs
6V 4Ah rechargeable battery
9V, 110mA solar panel, with built-in circuit to prevent
overcharge
Automatic day/night switch
Durable ABS plastic construction, easy to install,
hardware included
Completely solar-powered, no electrical wiring
needed
IP44 rated
Code:17733
Code:17734
While stocks last. E and OE.The Lighting Warehouse Page 2/2
Coast Guard-54 LED Solar Floodlight (code: 17735) -
R1 499.95:
The Coast Guard-54 LED Solar Floodlight produces a highpowered beam of illumination of approximately 100m². It is
powered by a solar module, which can be positioned up to
three metres away from the light itself. The Coast Guard flood
model has a bracket and built-in 7Ah rechargeable battery.
Technical details:
54 super bright LEDs on an adjustable light unit
12V 7Ah rechargeable battery
18V, 556mA 10W solar panel
Automatic day/night switch
Durable ABS plastic construction, easy to install and
rust-proof
Installation hardware included
Completely solar-powered, no electrical wiring
needed
IP44 rated
Chameleon 72 LED Double Spotlight (code: 17736) -
R1 499.95:
The Chameleon-72 Solar spotlight is powered by a solar
module, which can be positioned up to three metres away from
the light itself. Each of the spotlights has 36 super bright LEDs
and provide approximately 200 lumen each, which covers
approximately 100m². The model has a bracket and built-in
7Ah rechargeable battery. Each spotlight can be adjusted 90
degrees horizontally and 180 degrees vertically giving you
flexibility. A unique feature is the built-in voltage detector,
which reduces the output of the light after approximately five
hours in order to conserve the battery.
Technical details:
36 super bright LEDs per spotlight
12V 7Ah rechargeable battery
18V, 556mA 10W solar panel
Automatic day/night switch
Durable ABS plastic construction, easy to install and
rust-proof
Installation hardware included
Completely solar-powered, no electrical wiring
needed
IP44 rated
Charge time: 5 hours
Operation time: 5 hours full beam, then remainder of
the night 50% power to conserve energy
Sentry 108 LED Floodlight (code: 17737) - R1 699.95:
The Sentry-108 Solar Floodlight is powered by a 10W
solar module and 7Ah rechargeable battery. The 108 super
bright LEDs provide a lumen output of 520 lumen, covering
approximately 200m². A unique feature is the unit has a builtin voltage detector, which reduces the output of the light to
around 50% of the brightness after approximately five hours
in order to conserve the battery. The light fitting is made from
tough aluminium with powder-coated finish.
Technical details:
108 super bright LEDs give a high powered beam
illuminating beam
12V 7Ah rechargeable battery
18V, 556mA 10W solar panel
Automatic day/night switch
Durable powder coated aluminium construction,
easy to install
Installation hardware included
Completely solar-powered, no electrical wiring
needed
IP65 rated
Charge time: 5 hours
Operation time: 5 hours full beam, then remainder of
the night, 50% power to conserve energy
Code:17735
Code:17736
Code:17737
While stocks last. E and OE.


Monday, 10 September 2012


Replace a pool pump


If your pool pump is not performing as it should, the first things to check are the Kreepy Krauly and the hose pipes. If the Kreepy is not functioning as it should it can slow down water suction, or flow pressure. Click here for instructions on replacing the Kreepy diaphragm. Also, check the hoses for any holes, as these will also reduce the amount of water suction pressure into the pump. The next step would be to replace the pool pump.


replace pool pump
Like most things you buy these days, pool pumps have a life expectancy.
The average pool pump will probably last about 4 to 5 years, maybe longer if you are lucky. But sooner or later you are going to have to replace the pool pump.
My pump is about 5 years old and I thought it was starting to pack up. The suction seems to have dropped and it doesn't pull enough water through.


new pool pump
Replacing a pool pump is not a difficult project and will probably take about an hour to do. When replacing the pump, take note of the size of the pump.
The average pool uses around a 0.75kW pump, but if you take a look on the old pump there should be a metal tag that indicates the size of the pump that you have.
Builders Warehouse has a fairly extensive range of pool pumps at competitive prices.


While at the store you will need to grab a length of pipe, pipe connectors, elbows and bends, as well as Tangit adhesive. You will also need a hacksaw, screwdrivers and wire strippers.

remove pool pump

To remove the old pump, first switch off the mains electrical supply, as you need to disconnect the wiring for the old pump.

DO NOT attempt to remove the old pump without first ensuring that the power is switched off.


install pool pump
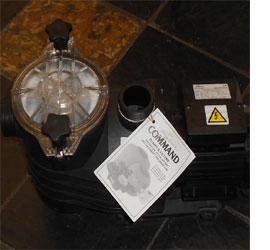
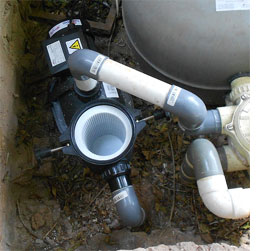
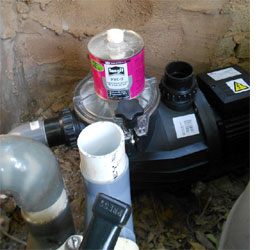
With the old pump out of the way you can place the new pump in situ and adjust the positioning until it fits nicely.
Chances are that the old pipes and connectors will need to be repositioned to fit onto the new pump, unless you are replacing with exactly the same model.
This is where the length of pipe, connectors and hacksaw come into play. You need to cut small lengths of pipe, add bends or connectors to join everything together.

Tangit is a PVC weld adhesive that is perfect for this type of job and dries very quickly.

fit new pool pump

Everything is now perfectly in place and it's time to PRIME THE PUMP.
To prime the pump, use a hose pipe to fill up the chamber (shown on the left) with water. You don't want to run the pump while the chamber is empty, as this could cause damage. Fill the chamber with water and then quickly pop on the vacuum seal/top.


Switch on the pump to test and look forward to plenty of healthy swimming during summer.
But wait a minute... something's not right here. The water flow is still sluggish. I have checked the Kreepy, replaced the pool pump and it still doesn't work. What now?
Another reason for sluggish water flow could be a blockage in the pipe. I know my kids have a bad habit of cleaning out the pool basket and then forgetting to put the basket back. Only when I see it lying on the side of the pool do I realise. Could be that debris has been sucked into the pipe and has caused a blockage. Busy working on this problem and will post my outcome of this shortl


Wednesday, 05 September 2012

                               How to Clean Rain Gutters


Six Remodeling Mistakes To Avoid


Doing it yourself can save thousands of dollars. But making mistakes during your remodel can be costly and dangerous. The key is to plan ahead, use common sense and take some tips from the pros.

Here are a few common mistakes remodeling rookies make.

Failing to locate water cutoffs

Before you start any work, especially in wet areas like bathrooms and kitchens, you need to locate the water cutoff in the house and at the street. This way, if a disaster occurs, you know where to head to cut off the flood.

Not preparing to localize and minimize dust and debris

Demolition is messy. Minimize the impact on your house by containing the mess. Create a work zone and keep tools and supplies inside it. Buy large sheet plastic and heavy duty masking tape to completely screen off doorways and openings. At the end of every work session, use a shop vac to get rid of dust and debris. Then take 15 minutes to organize your tools and supplies. It’ll make it quicker to get started next time.

Getting in a hurry

Sure it’s appealing to rip that wall separating the kitchen and the family room right out, but safe demolition demands planning and forethought. First, turn off all the electricity and water to the demo area. Use a stud finder that is equipped to locate metal to determine where wire and pipes are running through the wall. Then, using a small dry wall saw, cut some investigative holes to see exactly what’s behind the wall. This way, you avoid ripping out most of a wall only to discover it contains a vent or pipe that will be costly to move.
Not protecting surfaces
Mask every finished surface and keep it masked as you work. This means cabinets, walls, baseboards, flooring, and moulding. Cover countertops with interlocking foam tiles to deflect the impact of dropped tools. There’s nothing more discouraging than having to replace, repaint or refinish because of damage, spills or splatters.
Not having a Plan B for plumbing
You may think you’ll get your plumbing done in a day, but jobs have a way of expanding. Supply yourself with end stop fittings to cap off open pipes so you can turn the water back on in mid-job. Home Depot’s end stops are called Sharks; Lowe’s offers a line named Gators. They come in ½”, ¾” and 1-inch sizes and it’s smart to have an assortment on hand. Follow the directions for use.
Not protecting floors when you move appliances
Even builders make this mistake. Put down carpet or masonite (sweep or vacuum thoroughly first to remove anything that could scratch the floor) to roll the appliances over as you are installing them. This will protect new tile or wood flooring from damage.


New Act will place greater responsibility on estate agents


WEDNESDAY SEP 05, 2012

The new Consumer Protection Act (CPA) exposes agents to a greater risk than ever before says Elana Hopkins, an attorney with the Cape legal firm Dykes, van Heerden, Slabbert and Hopkins.
The new Consumer Protection Act governs the relationship between the buyer and the seller (if the seller is a "supplier" of properties) and the relationship between the estate agent, the buyer and seller in any residential property transaction.
This, said Hopkins, is because certain legal commentators argue that in terms of the act the agent facilitating a deal is doing so as part of his everyday business and can be considered by purchasers in legal terms to be part of the 'supply chain', although as yet no precedent has been set. By way of contrast, an individual home seller involved in a one-off transaction to sell his house is not in this category and is therefore exposed to less risk.
Hopkins pointed out that, although the 'voetstoots' clause still applies to sales between private individuals, estate agents in practice can find themselves in a position where buyers attempt to hold them responsible for defects in the home which had not been disclosed to them or to the buyer by the seller.
To protect themselves, said Hopkins, estate agents should now consider asking sellers to sign a Disclosure Certificate, listing all the known and also possibly the suspected defects in the property. If such defects become apparent shortly after the transfer, buyers says Hopkins, may attempt to argue that they should have been picked up by a diligent agent inspecting the property thoroughly - and they would hold the agent responsible for these. A disclosure certificate is proof that the agent did inspect the property and advised the Seller to disclose all the defects. However, agents will still have now to be extremely careful that no latent defects are being hidden by buyers.
Hopkins mentioned a case study in which serious weaknesses in the structure and damp spots in the walls had been hidden by the seller, who had cleverly arranged paintings and furniture so as to ensure that they would not be seen on a casual inspection. In such instances, she said, the purchaser usually tries to hold the estate agent liable.
Commenting on this matter, Bill Rawson, Chairman of the Rawson Property Group, said that he always advises against sellers allowing buyers to take occupation prior to transfer. When this is done (usually on an occupational rent basis), all too often, the buyer will find all sorts of aspects with which he is dissatisfied - and may then instruct his bond registration attorney to delay transfer until these matters are put right. Although such delays are, in fact, a contractual breach committed by the buyer, in many cases, said Rawson, the seller will be so anxious to see transfer go through as quickly as possible - especially if he is buying another property - that he will probably agree to the buyer's demands despite not being liable for the repairs, even though they involve his having to pay out extra money to rectify matters.
Hopkins points out, however, that even when occupation takes place on transfer, the buyer still has the right to approach the High Court on an urgent basis on issues with which he is not satisfied and he may well then obtain a court order that part or all of the sales price be held back pending the outcome of an action to be instituted. A court can determine who is liable for the repairs, but such actions can take years as a result of delays in our legal system.
Hopkins stressed that the Consumer Protection Act, although now law, has not been on the statute books long enough to obtain clarity on how it will be enforced. The Consumer Commission's decisions on these matters, she said, will be watched carefully. They will define the role and the responsibilities of all parties in property transactions.
"It is possible," she said, "that the changes in responsibility will not be as radical as feared - we will simply have to wait and see."
Rawson Properties Press Release